[Updated] - Best Budget SSD For Beginners and Students in 2020 - TechPrides


Best Budget SSD For Beginners and Students


Best Budget SSD For Beginners and Students

If You Using an Intelligent machine Like Pc/Laptop, Then I Want To Ask You Some Questions.

  1. Are You Facing Slow Speed in Your Pc/Laptop?
  2. Task Manager Always Full?
  3. Is Your Google Chrome is Very Slow?
  4. Are You Using Mechanical HDD?
  5. Would You Like To Use Heavy Softwares in Your Old Machines?
So If Your Answers is "Yes"? So I can Understand Your Problem Very well, Because of a Few Months back, I Facing The Same Problems.
But now, after lots of efforts and lots of research, I found Something That 100% Solve The Slow Speed of Your Computer. Ya, Exactly, I'm Talking about SSD. Almost Everyone knows very Well About SSD's, But No One Know About Perfect SSD For Your Pc/Laptop. And Guys, No Youtuber and Blogger Give me the right Information about SSD,


So I Decided To take a risk to buy SSD and Experience it myself the Power of an SSD. And Finally, I purchased an SSD From Online. And after a few months, I write from myself a detailed review of an SSD, which helps me a lot in My Daily Use. Now I Can Use Full Power of a Low Specs Laptop. So I am Using Dell Inspiron 3567 Laptop right Now, and You Never Believe that how slow is that until or unless you've used this Slow Like Turtle machine.


So now I'm sharing it with you. Some real Life magic Happens with me.


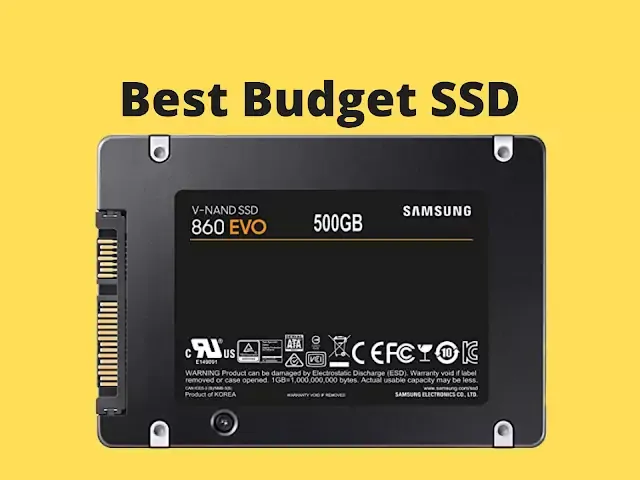
I bought a Samsung 860 EVO 250GB. And Trust me Guys I am Not a Paid Writer and I'm not get paid from and Brand. It's my detailed review of this SSD. You Won't Believe What Changes I Feel in My Laptop.
So, What Topics I am Going to Cover In This Review Article.

  • Task Manager
  • Google Chrome
  • Adobe Photoshop
  • Microsoft Office Apps Like Word/Excel/Ppt
  • Adobe After Effects
  • System Smoothness
  • Startup time

And Believe me Guys These All Softwares boost with SSD then Any Software You Can Run on Your Old Machine. End of the review You Know that which is the Best Budget SSD For Beginners and Students

So lets Start Review one by one.


1.Task Manager 


Before SSD Installation, Every time My Laptop 100% Disk Section and CPU Section and I'm pretty sure You also Facing Exact Same Problem. Because of its Mechanical HDD. But Now After Installing Samsung Evo 860 My Task Manager Process Never Jump up to 1% as You Can See in Screenshot Below

2.Google Chrome    


Google Chrome is One Of The Most Powerful Browsers in the world. Mostly Every Pc User Use For Surfing the Internet. Before SSD Installation, Whenever I Start Google Chrome It Takes To Much Time to Load all The Extension, which I Installed on Google Chrome. It takes up to 20 to 30 seconds to fully load and ready to working condition. But Now It Takes only Less than 1 second to load fully Browser. And You Can Work with lots of tabs efficiently.

3.Adobe Photoshop


If You are a Graphics designer, you must be familiar with adobe photoshop. It is the most powerful Software in the world for editing Photos and graphic designing work. But at the Low-end Pc's, it Might take 3 to 4 minutes to load fully, but on SSD, it Takes Only 30 Seconds. Yes, I Know 30 seconds is too much, but if you are using low specs Pc, It natural with SSD, and Work very Smoothly.

4.Microsoft Office Apps Like Word/Excel/Ppt


As You Know, Microsoft office is Heavy Software, and on Normal Hard Drive, It takes up to 1 Minute to load Ms-wordExcelPower-Point, etc. Because these apps are for Productivity and Highly Coded. That's why it takes Much More Time to load Fully, But on SSD, its loading time takes only 3 Seconds. Isn't it amazing?

5.Adobe After Effects


Best Video Editing Software comes from a Company 'Adobe.'

This Software is Heavy to proper run on standard specs Pc, and Normal Hard drive takes 3-4 minutes to load it completely. But on SSD, it takes less than 1 minute to load, and you can edit videos like a pro very smoothly on four gigs of Ram. So SSD is very Important for Video Editors, and Graphic Designers and Adobe Premiere pro Perform the same as AE.

6.System Smoothness


Before SSD, whenever I work on My lappy, Most of the time it unresponsive Experience, It's run like laggy-laggy, Hard to scroll Blah-Blah! It's Feel To heavy while Switching Between apps, Like Google chrome to task Manager or any other apps, even Microsoft apps as well. It's Horrible Experience for me. But After SSD Installation, it is Smooth like Butter. You Can Switch Between any apps or Software.

7.Startup Time 


Most of Youtubers says SSD Improves Boot-up time of windows, its 100% True, my friend. It helps me to increase my boot time. Before SSD, It takes up to 1 or 2 minutes to fully able to work, and after SSD, it only takes less than 15 seconds to boot and load all the drivers into the machine. And restart time is only 20 Second in Samsung EVO 860.


Finally, I can Say SSD makes a huge difference in performance. You can boost your low specification Laptop with Just an SSD. I recommend the Samsung EVO, 860. It is The Best Budget SSD For Beginners and Students.


Thanks For Reading This Article.

Thank You!
TechPrides 
Lakshya

Top 20 Windows 10 Tips and Tricks in 2020 - TechPrides

Windows 10 has been around for a while, and several updates have been released, including the fall 2017 creators update. I'm going to cover several tips and tricks that I found useful through early 2020. I hope you'll find them useful too. Here are my top 20 in no particular order. 

Top 20 Windows 10 Tips and Tricks in 2020 - TechPrides

1 - Spatial Sound. Give your Computer an easy upgrade to 3D Spatial Sound with the new Windows 10 feature. All you do is go in the lower right corner and right-click on your earpiece and choose Spatial Sound. From the menu, choose Windows Sonic or Dolby Atmos. now I've noticed that both of those sound very much the same, but the Dolby Atmos requires a download of an app, so I'm going to choose the Windows Sonic and hit OK. Try that sound quality now, and see if you notice the difference. 

2 - Steps Recorder. Steps Recorder is away to record your actions in Windows 10 and translates them to a handy document you can save and share. To run it, go to your Start menu and type in Steps. You'll see the Steps Recorder app. Click on that, and it opens up a simple recorder with a start and stops. I'm going to go ahead and start the record and do something as simple as open up a browser, move the browser around, and hit stop. It recorded all those steps, including the images followed by a detailed step by step instruction of every movement you've made. You can easily save this toa location on your hard drive and then attach it and send it to somebody with an explanation of how you wanted to walk through some steps. It makes it handy to show somebody what you're trying to do. 

3 - Media Streaming. Media Streaming allows you to share music, photos, and videos with other people on your local network. To enable it to find your network icon in the bottom right corner of your desktop. Right-click on that and go to Open Network and Sharing Centre. Choose this Change Advanced Sharing setting and hit the down-arrow next to all networks. You'll see the media streaming menu with Choose Media Streaming Options. Click on that, and this is where you enable the streaming. You can choose to allow All Computers to select between All Networks or Local Networks, and when you're ready with a name, you can just hit OK, and that makes your media files discoverable by other computers on your network. 

4 - Quick Assist. Quick Assist is available from your Start menu. Just click Start, type in Quick, and select the Quick Assist desktop app. This brings up the Quick Assist menu, and you have two choices. You can either Get Assistance from somebody else, or you can give Assistance. In this case, I'm going to select Give Assistance. You sign in to your Microsoft account, and it provides you a security code with ten minutes to make the connection. All you have to do is contact the other person, give them the security code. They choose to Get Assistance from the menu and enter the code to connect to you remotely. You can also choose to copy it to your clipboard or send it to them via email, and once they open the email, they can select that code and connect. Once the code is entered, you will remotely control their desktop, and you can walk through stuff together with them over the screen. 

5 - Reset This PC. Occasionally we run into problems with windows, and you have to reinstall. Well, you can prevent doing that by choosing Reset This PC. Go to Start, click on the Settings gear, go into Update & Security, and choose Recovery from the menu. Right at the top is Reset This PC. If you click Get Started, it gives you two choices. You can keep your files, or you can remove everything. Windows takes a few minutes, and it recovers everything back to the original factory defaults. If you choose to keep your files, all of your files will be there, but it does remove apps, and you'll have to reinstall the software, but it's surprising how many problems with Windows this will solve. 

6 - Fast Stratopause Start-up has been around since Windows 8, but the fall creators update turned Fractostratus on by default. You can get to it by going to the Start menu, going into settings, click on Power, select Power and Sleep, choose Additional Power Settings, and select Choose What the Power Buttons Do. And here it is with Fast Start-up enabled. Shutting down your Computer doesn't shut it down. It enters hibernation mode that allows for quick booting. You may want to turn this feature off to shut down fully, but if speed is your preference, check to make sure this option is enabled. 
7 - Storage Sense. Storage sense helps you get rid of junk files when you're getting low on disk space. It is turned off by default, but to turn it on, go to your Start menu, into Settings, click on System, and go to Storage. Right here is Storage Sense, and as you can see, it turned off. So, we're going to click that to turn it on, and we're going to change how we free up space. With it turned on, it automatically deletes temporary files that apps aren't using, and it deletes files that have been in the recycling biovar 30 days. You can also go to Clean Now, and it triggers those commands automatically. It's a helpful tool to keep this automated process of cleaning up your disk space. 

8 - Snipping Tool. The Snipping Tool is a handy apport taking snapshots of your screen. To run it, click on the Start menu and just type in Snip. Select the Snipping Tool app, and it opens the Snipping Tool. Click New, and it allows you to select an area of the screen, and it brings it up into the snipping tool where you can edit and copy, paste, save, do whatever you want to. It comes with nifty little tools like a pen you can change the colors, a highlighter, or an eraser, and you can select the highlighter, for example, and highlight an area on your screen that you want to identify. You can turn around and save it, give it a name, and send it to somebody. You also have a mode option where you can change it to a rectangular snip, which is the standard, or you can make it a freeform snip, and it allows you to highlight an area by drawing a circle around it and then it just captures that information. It makes it very easy to copy screen information to share with others. 

9 - Night Light. Night Light is a setting to reduce the blue light emitted from the screen that often keeps you awake at night. To enable it, click on the Start menu, go into Settings, click on System, and right on the main display screen scroll down to the Night Light. You can check this box to turn it on, and you can go into the Night Light Settings to adjust things. If you want to enable it right now, you can click this button. If you want to adjust the temperature slide, this bar back and forth, and you can even set it to be on a schedule and set the hours of when you want to turn it on and when you want to turn it off. If you want to use your computer at night, you may want to enable the Night Light setting. 

10 - Aero Shake & Snap. Windows 10 brings new capabilities to manage windows on your desktop. If you grab a window and shake it, it minimizes everything behind it. If you shake it again, it brings them back. You can also take a window and bump it to the top to make it full screen. Drag it down, and it returns to the original position. If you drag it to the left, it opens it up on half of the left side of the screen and allows you to select from one of the other windows to bring up on the right side of the screen. Drag them back down, and they return to their original size. You can also drag a window down to the left corner, which brings it up into the one-quarter area of the screen. Drag the other ones to the other corners, and you can adjust Windows by doing the Aero Snap & Aero Shake capabilities. 

11 - Edge Reading View. Windows 10 has replaced Internet Explorer with Edge, but did you know that Edge has a reading view option? If you look at this page, there are several graphics and advertisements mixed within the text, but if you click this Reading View option, it makes it into a nice readable format and eliminates a lot of the other junk. 

12 - System Restore Point. To avoid having to reset your PC as I showed earlier, it's a good idea to create a system restore point. Go to the Start menu, type in Restore, and click on this. Create a Restore Point. Now at the bottom, click Create and type the name and hit the Create button. This creates a system restore point if you have any problems with Windows updates or other damage to Windows files. To restore, you can click on this System Restore button, click Next, and you can select from the list of previous restore points. Hit next, and your Computer will be restored to the state it was in at that point.  When I have a good, clean working copy of Windows Igor ahead and make a restore point, I'll be able to recover from that later if I run into problems. 

13 - Hidden Start menu. Did you know Windows has a hidden Start menu? All you have to do is right-click on the Start menu, and it brings up several options mostly from your system settings, but it also gives you the File Explorer and some other options for shutting down or signing out. It's a handy, little quick menu. 

14 - Default Apps. Have you ever had the wrong application load when clicking on a file?  Windows 10 has moved the location of default app settings. Click on Start, go to Settings, choose Apps, and select Default Apps. The most common apps are listed with their associated defaults. Just click on the heap that you want to change and select a different one from the list or if it's not listed, you can look it up in the App Store. The default apps are listed here, but if you don't see the one that you want to change, you can choose Default Apps by File Type. This brings up hundreds of known file extensions with their associated default app, and you can change one just by clicking omit and selecting from the list in the same manner. So, if the wrong app opens when you click on a file, how do you fix it. 

15 - Download Maps. If you intend to go offline with a mobile device running Windows 10, it's a good idea to download your maps before you do that. Click on Start, Settings, and go into Apps and choose Offline Maps. Click this to choose an area that you want to download, and it will download that map and make it available when you're offline. 


16 - Notifications. In the bottom right corner of your screen is the Notification Action Centre, which gives you quick access to commonly used settings and notifications. You can customize this area by going to Start, Settings, System, and click on Notifications & Actions. Modify the list by holding down and dragging these icons around, and you can rearrange them however you want. You can also change the notifications coming from apps by turning on and off these different settings here, and you can select individual apps and turn them on or off for notifications. So, if you have a bunch of pesky notifications coming up, just turn these off. 

17 – Start-up Programs. When Windows 10 boots, some applications load start-up automatically. Over time you may have made changes that leave unwanted applications in the Start-up. To speed up your Computer and clear these unwanted apps, go down to the taskbar, right-click, and run the Task Manager. In the window, click the Start-up tab. You'll notice several apps are loading at Start-up. Take a look at this list and right-click on any that you want to disable. That reduces the load at start-up and makes your computer boot much better. 

18 - God Mode. As you've seen in this video, several settings and windows are divided between the Control Panel, the Start menu, and the Settings menu. With each new version of Windows, we often see changes to menus, and it's not always easy to find them. God Mode is the answer. Just create a new folder on your desktop and copy and paste this information and hit enter. This creates an icon that connects you to the program tasks list. Open it up, and you'll see all of those menu items in one big long list. That's God Mode. 

19 - Advanced Performance. Windows 10 has added animated controls, animations, translucent windows, and a host of other features to improve the look and feel of the System. If you're looking for peak performance and don't care about those improvements, you can crank up the system performance by going into the Control Panel, click on System, and go to Advanced System Settings. From the Advanced menu, click on Settings. Change this from Let Windows Choose What's Best for my Computer to Adjust for Best Performance. That eliminates a lot of those settings and speeds up your System. Give it a try and see if you notice the difference. 

20 - Virtual Desktops. An advanced feature in Windows 10 virtual Desktops. With Virtual Desktops, you can create multiple, separate desktops with different apps and windows, allowing you to organize distinct desktops for each purpose. Its represented by this Task View button on your taskbars. When you click it, it comes up with the open applications on your desktop, and there's an option in the bottom right corner to create a new desktop. If you hit that, it creates a desktop one and a desktop 2, and you can now move applications into each one. 

So, for example, I can take this word document and drag it over to desktop 2, and now I have different applications between those two locations. Now you can open up windows in your new location, click the task view, switch over to another desktop, and have a separate set of windows and applications located there. Click the Windows-Tab buttons to select between those desktops rather than clicking the task view. You can also switch between them with Ctrl-Windows-Left-Arrow and Right-Arrow. You can create as many virtual desktops as you would like, but I recommend using them as temporary workspaces to help you get organized. That is the main purpose.

ALSO READ:  Best Budget SSD For Beginners and Students

Thanks For Reading This Article.

Thank You!
TechPrides 
Lakshya

How to Start a YOUTUBE CHANNEL in 2020 - TechPrides


How to Start a YOUTUBE CHANNEL in 2020


Top 20 Windows 10 Tips and Tricks in 2020 - TechPrides

I'm going to be walking you step by step through the entire process of starting your YouTube channel from scratch. We're going to talk about how to decide what your channel should be about, what to name your channel, and I'm also going to give you some tips on actually how to get your channel started. And most importantly of all, we're going to talk about how to get views on your channel even when it is brand new and you don't have any subscribers yet. So, if you want to start your own YouTube channel this year, then just keep on watching. In order to start your channel, the very first thing you need to do is just decide what your channel is about. And that's something you might have already done; you might already know exactly what you annual about on your channel. But you also might be a little conflicted, maybe you have a bunch of different ideas and you're trying to pick one.

If that's the position you find yourself in then there are three main things that you'll want to keep in mind. First one is just that your channel really will do the best if you pick a topic to focus on. Now, if you are brand-new to making videos, it's totally fine if you want to just start making videos about anything you feel like to get your feet wet and to get your channel off the ground. That's fine. Don't feel like you have to narrow it down right at the beginning. But your channel probably won’t start to grow until you do pick one main topic to focus on. Next, as you're picking that topic, don't feel too much stress about it. It's okay if you pick a topic and then later decide to change your mind. And the reason for that is because when you first start your channel no one is going to watch your videos right at the beginning anyway.

You're going to be learning how to make videos, you're going to be learning a whole lot. And after you start talking about a topic, you might discover that you don't have all that much to say about it or there's something else that you'd really rather talk about. So, don't feel much pressure with picking a topic. Just pick something that you’re interested in and go with it so that you can get your channel off the ground. And the last thing you should think about as you're trying to decide what your channel should be about is that different things are popular this year than were popular last year. And if you want your channel to be as successful as possible then you'll want to pick something that other people are also interested in. Now, don't think that you have to do this, because whatever you want to talk about, I'm sure that there are other people who are interested in that topic as well.

But it's just something to keep in mind, especially if you're trying to decide between a few different ideas that you're interested in. So how you can figure out what’s popular right now is to use a free tool called Google Trends. You can use Google Trends to look up different topics that you're thinking about talking about on your channel to see whether they are gaining popularity or declining in popularity. You don't necessarily need to pick something that is uber popular but you do want to pick something that is becoming more popular, not dying away. Once you've decided what your channel will be about, or at least you've picked something that you're thinking about making your channel about, you can move onto step two, which is to brainstorm video ideas. This is something that I always recommend people do before they start a channel for two main reasons.

First of all, because if you brainstorm video ideas it's going to make starting your channel easier because you have to have video ideas in order to start making videos. But the second reason is because it can really shed some light on whether or not you picked the right topic for your channel. So specifically, I’d recommend that you brainstorm one hundred video ideas. Now, I know that that might seem like a lot but if you can't think of a hundred video ideas on that topic that you're considering starting your channel on, then that could be a sign that you might need topic a different topic, something that you have more to say about.

Coming up with these one hundred video ideas will give you a lot of confidence that you're not going Torun out of things to say and it will also help you to find the very best video ideas. Because you'll be picking from such a long list as you decide which videos to film first for your channel, you'll be sure to find some really good ideas. Step three of the process of starting your channel is research. You need to look up these video ideas that you are considering making on your new channel and find out if they’re actually good video ideas.

Find out if other people will be interested in them as well. So, this is going to take you a step beyond just using Google Trends and now you're going to do two different kinds of research, one is keyword research and the other is competitor research, to discover whether these specific video ideas will be popular. So, let's take just a minute to talk about how to do each of those kinds of video research. The first one I mentioned is keyword research. Basically, what keyword research is discovering how many people are looking for a certain keyword each month. So, you're trying to discover how many hundreds or thousands of people are looking for certain words that are related to your video idea. For example, if I was thinking about making a video about how I edit my YouTube videos, then I might look up the keyword video editing tutorial to find out how many thousands of people are searching for that on Google or YouTube every month. And then I can compare that number to other videos that I’m considering filming to find out which one is the most popular idea.

There are many different free tools that you can use to do this type of research, including Google's AdWords Keyword Planner tool and also a tool calledKeywords Everywhere. The other type of research that you can do to figure out whether or not your video idea is a good one is competitor research. So, this is where you look at the videos that your competitors are making and you see which ones are performing well and how well your ideas performed if they made them on their channel. So, in order to do this, first of all, you'll need to identify some competitors. So, all that means is you need to find some other channels that are similar to the channel that you want to create and are making videos similar to the videos that you want to make. Once you've identified these competitors, you can take a look at the videos on their channel and then sort them by most popular to see which videos have done really well for them.

This can give your ideas for videos that you might want to make on your channel because they've been popular. The other way you can do this is by searching for you video on YouTube and seeing how many views that video has gotten when other people have made it. Okay, so at this point, you've decided what your channel will be about, you've come up with a bunch of video ideas, and you've figured out which ones will really perform the best on your channel. So now it's time to actually get to work and start making this channel. The first thing you'll want to do is decide what you're going to name it. You could either use your own name and you could use a different name related to the topic that the channel is going to be focused on. Now, as you're trying to make this decision, what I'd recommend you do is you think about what the channel is really about.

Now, I already said it should be focused on a topic so you might automatically think your channel is about that topic, but there are many channels out there that are actually personality-driven channels that are about a topic, channels that are really about the creator who's making the videos and that creator's take on the topic. So, you need to think about what your channel is going to be about. Is it really about the topic and you're just the person who's presenting the information? Or is the channel really about you and then focused specifically on your interest in this topic? If the channel's really about you, you'll probably want to use your own name, and if the channel’s really about the topic, you'll probably want to pick a name related to the topic. Now, it's not a hard and fast rule.

If you really want to use your own name, you're, of course, welcome to do that. Or if you don't feel comfortable with that for some reason, you're welcome to use any other name you want. My last little bit of advice about picking a name is just to make sure that the type of name you pick fits the style or the feel that your videos are going to have. So, for example, if you want your videos to be really polished and professional and corporate, then you wouldn't want to pick a silly or random name that doesn't have that same feel. But on the other hand, if your videos are more casual and laid-back or funnier, then you wouldn't handpick a name for your channel that is more corporate feeling or more official sounding. Step number five of this process is where you really start taking action and making things happen and it is when you create your channel. You needed to pick the name first because when you create your channel YouTube is going to ask you what you want to call it. Creating the channel is actually very, very simple. I have another topic about exactly how to do it if you're not quite sure.

You can click up there in the card right now or down below if you Wannsee that quick tutorial. But if you just clicked create an account up in the far, far corner of the screen, then you will be able to create a channel. Or if you already have an account, you can click the upload video button and if you don't have a channel yet, YouTube will prompt you to create the channel so you can upload your first video. Once you've got your channel created, then it is time to start making your first videos. This is obviously going to be the biggest part of the work that you do for your YouTube channel and the thing that foregoing to keep on doing on into the future. So, if you don't get it right at the very beginning, don't worry about it.

Almost everyone's videos are pretty terrible at the beginning, so if yours are decent then you're probably doing better than average. I'll let you know right now that for the first year and a half of running this channel, as it was growing pretty quickly, I was shooting all my videos with my camera on automatic mode because I didn't really know how to work my camera. But it got the job done because here on YouTube, people are here way more forth content of the videos than they are for the technical quality of the videos. Now, when I say that, I don't mean that people only care about the information. They care about a lot more than that. They need to be somewhat entertained or have some other reason to stick around. They need to wonder what's going to happen. Because if they get bored, they will not keep watching your videos. They'll click on one of those suggested videos over there, you'll lose them, which means YouTube won’t promote your videos and you won't get very many views.

So, as you're starting to make videos just keep that in mind. Your quality will improve more and more and more, but make sure your videos aren't boring. Add as much into them as you can to keep them interesting. If you want to learn more about how to create videos for YouTube, then click up in the card right now or check the description down below for a video I made a few months ago about how to make your first video for YouTube. I walk you through everything you need to know, including what equipment you should use, how to set it up, and how to get that first video filmed. Okay, so you're almost there.

You've made some big decisions about what your channel should be about, you've created the channel itself, and now you're making videos. And there's only one thing left to do in order to turn your channel into a success and that is to get views on your videos. So right now, I'm going to share with you the two main ways that you can get views on your videos here on YouTube.

The first one is one of the most common things that people do and that is to promote your videos on social media. So, share a link to your videos on Instagram or Facebook or whatever platform you're on. Now, this works for some people, but there are two potential problems with it. The first one is that most other social media platforms want their users to stay on the platforms and so if you share a link to your YouTube video on the platform, that link or that post that you put on the platform probably isn't going to do very well, which means not very many people will see it, not very many people will click on it, and it's not going to really earn you very many views. And then the other potential problem is that you might not have a following on any other social media platform. And if you only have a few friends on Facebook or a few followers on Instagram, it's really not generated much of an impact on your YouTube channel.

Now, that's not to say that you shouldn't still take advantage of that opportunity to get views. Especially when you're first starting out, every single view count and so you should be telling anyone and everyone you can about your YouTube videos. But as you're trying to grow your channel more, trying to get hundreds or thousands of views, just know they're not connectome from social media. They need to come from the other way that you can promote your videos, which is to promote them here on YouTube. Now, I'm not talking about paid advertising. Paid advertising on YouTube doesn't typically work very well to grow a channel and it is expensive if you anna get hundreds or thousands or hundreds of thousands of views.

I have not done a single penny of paid advertising on this channel and it has organically grown to over 300,000 subscribers. So how did that happen? Well, it happened with this second way of promoting your videos. Promoting them here on YouTube organically. Mostly, this means making good quality videos, videos that are interesting, videos that people like watching, so that when people watch them, they keep watching them, YouTube perceives that people like them and YouTube promotes them for you. That is how your channel can grow the most quickly and the most easily, how you can get thousands of subscribers in not very much time and without very much work. I know that this most almost sound too easy, like all you need to do is focus on the quality of your videos, focus on making good videos, and your channel will grow, but that's really what it comes down to.

Now, it's not that easy because there are plenty of other people out there who are also trying to make great videos, but the better your videos become the more you'll rise above your competition, the more views you'll get on those videos, and the more subscribers your channel will get. This is especially important this year because as the years have gone on and YouTube has continued to improve its algorithm, views on YouTube have been more and more driven by the algorithm. These days, it's almost impossible to build a successful channel on YouTube if you aren't working with the algorithm to get those views. Because getting views on YouTube is such an important part of the process, I put together a complete hour-long workshop that will give you way more information about this part of the process.


Thanks For Reading This Article.

Thank You!
TechPrides 
Lakshya